Friday, December 2, 2011

Our Advent Calendar...and some ideas

I thought I had published this post a few days ago, but for some reason it didn't post. Whoops.

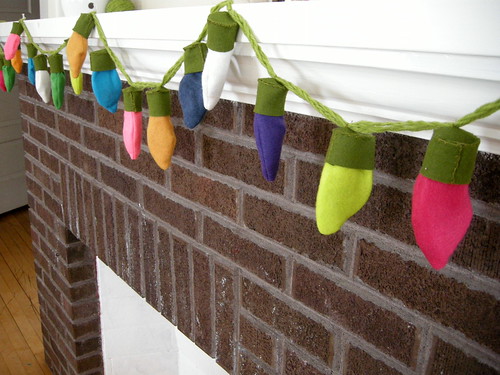
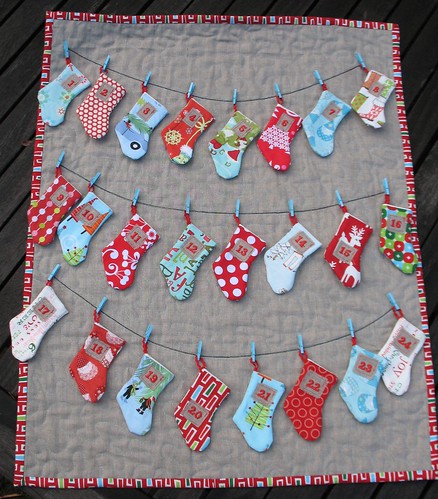
I *finally* finished up our advent calendar on December 2nd. A day late. But it was totally worth all that hard work to see it hanging up in the (otherwise undecorated) living room.

Advent Calendar

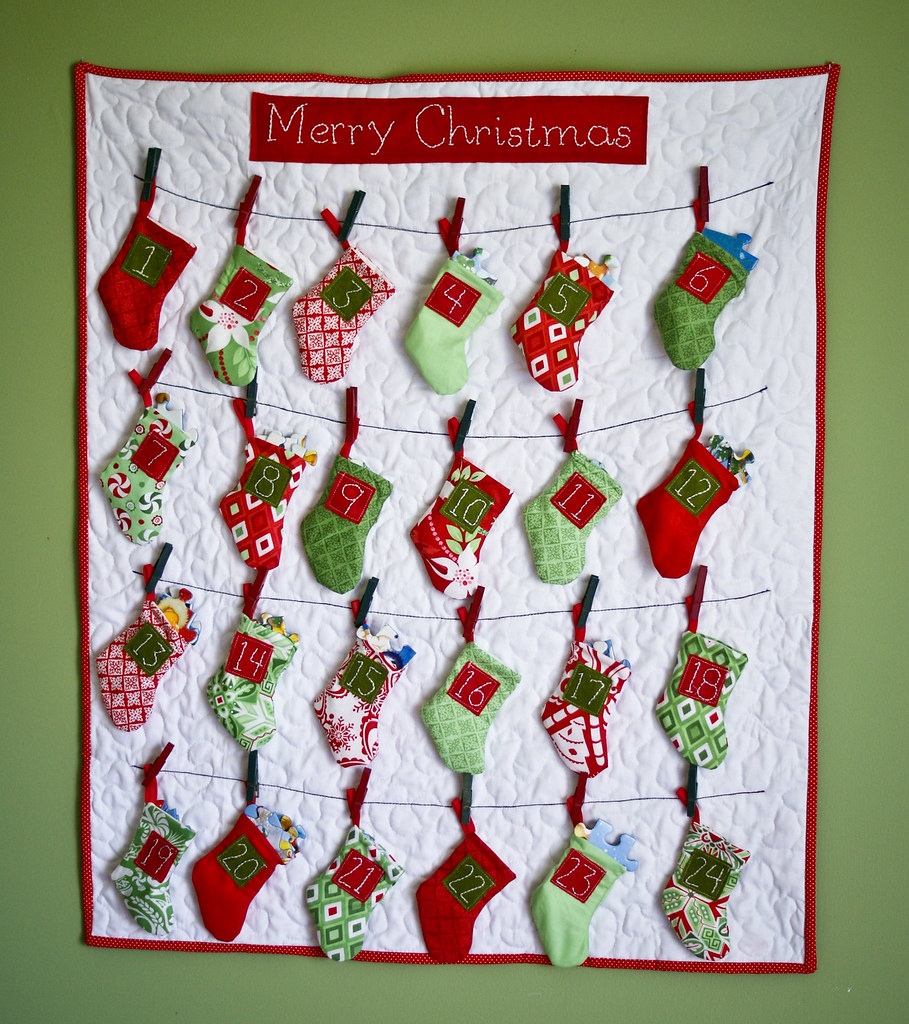
I used this tutorial, with just a few size modifications.

Advent Calendar

As promised, here is the list I've come up with to fill our calendar with lots of good cheer this Christmas season:

Every day: I bought a 100 piece Christmas Ravensburger puzzle and assembled it and then disassemble it in sets and put several pieces in each stocking. Each day she can add to her puzzle - and it will be complete on Christmas Eve. It's a good visual for her since she still doesn't totally understand the concept of time.

Activities: I'm not assigning days to these until I'm sure what's going on that day. Most of them are things that we would have done anyway, but it's fun for her to look forward to something.

Sleepover at Nana's
Sleepover at Nona's. (yes, she has a Nana and a Nona)
Go see the Christmas lights on the boardwalk
Christmas shopping at the dollar store (I plan to give her 10 $1 bills to buy gifts for her cousins and her brother)
Shopping for toys for tots or Angel tree
Decorate the house for Christmas
Put up the tree
Bake Christmas cookies with Gramma
Make special Christmas cards for grandparents
Paper cone Christmas tree craft
Watch TV Christmas specials (love DVR for this!)
Cousins Christmas party
Visit "Walk through Bethlehem" (live nativity)
Aunt Hannah sleepover
Christmas cookies for Sunday School teachers
Wrap Christmas gifts
Visit Santa
Christmas caroling

That's 18 activities, which should be plenty. Sunday is a pretty full day around here, so those days will just be a piece of candy and the daily puzzle pieces. Some days just won't work for any activities and those days will be a gift:

New Christmas movie
New Christmas book
Colored pencils and a Christmas coloring book

I'm hanging on to all the activities/gifts to decide on until the night before. I planned on decorating the house as one of our first activities, but Maddie was sick this week, so I used the new Christmas movie (Elf!) and the TV Christmas specials since she wasn't up for anything else.

That's it! One thing that this calendar has really made me do is get organized for this month! When you sit down and realize how much you actually want to accomplish in one month, it becomes apparent that you must plan ahead to fit it all in! This is the first year since we've been married that I'm not working at all - (if you don't count sewing and crocheting into the wee hours), and I'm SO excited about the prospect of a whole month of uninterrupted Christmas merriment!

Advent Calendar

Molly

Wednesday, November 16, 2011

All about Advent... and a calendar round-up

Last year, one of my facebook friends made an incredibly awesome Advent Calendar and I was totally inspired. Honestly, I really wasn't even sure what Advent was, we never celebrated it when I was a child, but all I knew was that she made a really cool looking calendar with pockets and I wanted in on the fun! Of course, it was too late in the season to make one last year, but I've been eagerly anticipating the start of this Christmas season so that our little family could participate.

But, first things first. What is Advent?

Quite simply, Advent is a countdown to Christmas. It's traditionally a time for Christians to reflect on the birth of Christ and to prepare for his coming. Advent is taken from the latin word "adventus" which literally means "coming". Advent actually begins the 4th Sunday before Christmas, but Advent calendars begin on December 1st.

The Advent Calendar is simply a physical way to countdown the 24 days of December leading up to Christmas and there are literally a hundred different ways you can do it. There is no right or wrong way and it can be a simple or elaborate as you want it to be. In most cases, the calendar contains 24 vessels of some sort - one for each day of December. Pockets, drawers, cones, stockings, envelopes, tins...you get the idea. Alternatively, the advent calendar could be something that is added too every day until it is finally completed on the 24th. An example of that kind of calendar would be a mini tree that gets an ornament each day.

The web is chock full of amazing homemade calendars and fabulous ideas for celebrating advent and there are plenty of other calendar round-ups, but here are some interesting ones that I thought were worth sharing.

Make an Advent Calendar:

This is about the cutest thing I've ever seen - A felt garland of bulb lights. You've got to click over and check it out. If we had a mantel, I'd totally go that route.


I'm really leaning toward making something similar to this for our calendar this year. Love, love it.


This activity advent calendar requires a minimal amount of sewing and is totally functional AND adorable.


Here is a basic quilted calendar with pockets - there are so many variations to this calendar!


Another cute non-quilted hanging calendar with pockets. Love the linen look!


No sew, easy advent calendar ideas:No sew, easy advent calendar ideas:

Paper Chain - It doesn't get much simpler than that! We used to make a paper chain to countdown to birthdays and other exciting events when I was little. This would be a great way to get the kids involved in making the calendar - have them decorate paper to be cut into strips and linked together. As a twist, write an activity (or the first clue for a scavenger hunt!) on the inside of each chain. Each day as the links are removed, the child can find out what fun activity is planned for the day.


Paper Origami Boxes - This is a particularly cute little paper calendar.


Paper Cones - Okay, this is adorable. You could just as easily make this into a garland for the mantel or staircase.


Buy a Calendar or Kit*:

These are all from Etsy, because 1) Etsy is awesome and 2) supporting local, home-based businesses is so vital at Christmas time!

This one is PDF file that walks you through printing little paper boxes that can be arranged anyway you want:

Here's another DIY kit that is SUPER cute. This one has a pocket with a ornament that signifies a different part of the Christmas story that can be hung on the tree each day.

This one is another garland version with little distressed tags for each day of Advent.

Another garland with a pennant look. This DIY kit includes Bible verses paraphrasing the Christmas story for each day.

*Note: I found all these calendars just by browsing on Etsy, I've never ordered from these sellers and thus can't personally recommend them - I just think their stuff is super cute. ;)

I think I've finally decided on plan for our advent calendar this year - I have fabric ordered and list started for activities and gifts for Madeline. But I think I'll save all that for another post - this is getting lengthy! Look for that post next week.

Monday, November 7, 2011

Dresden Plate fun...

Since I've begun dabbling in quilting, I've been dying to try out the dresden plate block. It's so very vintage, but can still be modern and fun with the right fabric choices. (side note, the more I sew, the more I realize how much it really, really is all about the fabric)

I made this little table topper for my sister's birthday - she just did a little kitchen revamp and I tried to tie in a lot of the colors she chose.

Dresden Plate table topper

I intended to just quilt an outline around the flower, but I got carried away and ended up carrying the zig zagging pattern all the way to the edges of the topper. I kind of love it.

Dresden Plate table topper - details

My "to-do" list is a mile long, but I'm still hoping to make a Christmas version of this for my table.

Doesn't it look cute on my sister's corner table?

Dresden Plate table topper

Molly

Tuesday, November 1, 2011

Little Bo Peep and Her Sheep

It's been a busy summer. And a busy beginning of fall (can someone please tell me how it can possibly be November?). Anyway, that's my excuse for being so absent. But November seems like a good place to get back in the swing of things in bloggy land. Also, yesterday was Halloween...and that's my weak segue into sharing pictures of my cutie pies in their costumes.

Meet Little Bo Peep and her sheep. They make a cute pair, no?


I know that my days of dressing them in coordinating costumes are numbered, so I figured I would take advantage while Maddie can still be easily persuaded. She was honestly excited that her brother was going to be her little sheep.

Will was a little angel and didn't fuss at all about wearing a hood and hooves.

Will the sheep


Madeline had SUCH a good time trick or treating (this was her first year), that I have a feeling that I'm going to be hearing about it for weeks to come.

Her costume is a doctored up version of The Precious Dress, which you know I just love. I've lost count of how many times I've used it, but you can see a couple versions here. I also borrowed some ideas from the Cinderella dress you can find over here. I searched high and low, but I couldn't find a tutorial for exactly what I wanted for her bonnet, so I just winged it. I'm pretty pleased with how it turned out, even though I was totally improvising as I went.

Maddie's eyes lit up when she looked at herself in the mirror after trying on her costume - and that always makes those hours behind the sewing machine worth it. As a bonus for Mommy, this dress will also double as her Plow Days dress for next spring.

Little Bo Peep and her sheep

Will's lamb costume is a Tom Arma costume I scored off of ebay on the cheap. Love that!

I really have been busy in the past few months doing all sorts of crafty things, including a complete bedroom set for Will, so I have plenty to share - just need to carve out the time for blogging! Wiping noses and filling bellies always comes first, you know. ;)

Molly

Wednesday, July 6, 2011

Messenger Bags for the girls

Last week my littlest sister and my niece came over to make bags with me. My sister Louisa was just 7 months old when my oldest sister got married and 10 months later - my niece Siera was born. They are the best of friends and completely inseparable. And now they have matching bags.

Messenger Bag

My sister Katie helped them pick out and order the material. I was a little unsure of working with the nylon canvas, but it worked out beautifully.

Messenger Bag

We even had some excitement when Louisa lost her 13th tooth in the middle of constructing the bags.

Photobucket

I will admit that even though we intended for the girls to help sew the bags, I ended up doing all the sewing. The girls did help cut the pieces out and then spent the rest of the day refereeing the other kids with my sister and watching Toy Story 3. And they even mananged to NOT cry uncontrollably at the end like I did. Anyway.

Let me tell you how fabulous this tutorial is. Clear directions, helpful pictures. This was my second time using the pattern and I have another bag cut out for a birthday gift. One of these days I'll get to make one for me!

Messenger Bag

Molly

Friday, June 17, 2011

Skirt Week!

Crafterhours (seriously, how clever is that blog title?) is hosting "skirt week" 2011 and I decided to enter a few skirts into the competition. The deadline is....ummmm....today, so I figured I'd better get down to business and finish up my skirts!

First - a couple for Madeline. She still has to be bribed to wear pants, so skirts and dresses and anything girly is right up her alley. Plus, skirts are so easy for summertime! I'll start with my favorite:

Photobucket


Photobucket


I fused a large piece of seafoam Kona cotton to some fusible web (I use wonder under) and used a sippy cup lid as a template to cut out about 25 circles. I fused them to the white skirt piece and then topstitched them all in matching thread. I decided it needed something else, so I made an underskirt in aqua - about 2 inches longer than my white circle piece. Then I attached the waistband and made a casing for the elastic.

I love it so much! The 3-D circles give this skirt a little pizazz and seafoam is one of my favorite colors.

Next, a skirt in the same style, but just a little simpler. No underskirt and no applique.

Photobucket


Photobucket


The prints are one of my favorite Heather Bailey fabric combinations. (Ewww, I just noticed I really need to clean my baseboards. And is that crayon on the wall?)

And now two skirts for me! I'm going to be totally honest and tell you that getting dressed post-Will has been a challenge. Mostly because NOTHING FITS ME!! I'm telling you, it's ridiculous. Anyway. I think my point is that I needed some new clothes anyway. Or maybe I just needed to get that off my chest. Either way, here's skirt numero uno:


Photobucket


Elastic is NOT my friend. I need as little bunching fabric around my nicely padded waistline as possible. So I made a waistband and shirred the back of the waistband to make it a pull-on skirt. The fabric is a light-weight black denim. I'm going to get a lot of use out of this one.
Here's the back.


Photobucket


I actually made the following skirt for Easter. It was my first time drafting a pattern for myself. Much easier than I thought it would be. I used this tutorial as a guide for creating a 6 panel skirt. There is no elastic (thread or otherwise) on this one. It closes with a zipper. I added a blind hem to make it more fancy. ;)

I've already wore this skirt to church three times. It's an AWESOME pattern, because you don't have to mess with pesky darts and it's made to fit YOU, so...it's a perfect fit! A little time consuming, but most worthwhile things are. The fabric is Benartex "ZuZu's Petals".

Photobucket

What is your favorite skirt pattern? I had intended to make one more for me - I'd like to try a tiered peasant skirt with a zipper (staying away from elastic, remember?), but I ran out of time. Maybe by the end of summer. Check out all the other great skirts entered in "Skirt Week" here on Crafterhours - there is a link to the flickr groups for each category in the sidebar.


Molly

Tuesday, June 7, 2011

Kaleidoscope Quilt Along!

I've been wanting to join a quilt along for awhile now and Don't Call Me Betsy just gave me the perfect reason: The Kaleidoscope Quilt! I've been eyeing this quilt for such a long time and this was a great excuse to bite the bullet and put the pedal to the...err...carpet?

This quilt will be a challenge for me, because I plan to make it entirely out of my current fabric stash, which is dwindling by the day. I'm going to have to buy solids and backing, but other than that, I'll be raiding my craft closet.


I have until June 23rd to pick fabrics, so in the meantime I plan to finish up this little crib quilt:

Photobucket

Yup, more pinwheels in a house. These blocks just make me happy, I can't wait to finish this top!


Molly

Thursday, May 26, 2011

Something for the kids...

Edited to add: I posted Will's birth story over on my personal blog - I know a few of you have been asking, so click on over if you want all the gory details. :)

I've been trying to include Madeline in my crafty endeavors whenever I can. Usually this involves setting her up with paint and paper while the baby sleeps so I can sew or giving her some crazy scissors and paper and letting her go to town. When I saw this cute project over at Cluck Cluck Sew, I knew I had to make one of these with my girl.

I cut a "M" out of an empty cereal box, cut up some scraps from my scrap box, handed her a bottle of glue and let her have at it. She had so much fun!


Photobucket


Photobucket


Photobucket

Photobucket

When we were finished, I punched two holes through the top and hung it on some pink ribbon and she put it on her doorknob. I intended to hang it on her door, but she was very unhappy that she couldn't reach it "all the way up there", so the doorknob it is.


Photobucket

Also, in the interest of full disclosure, I do NOT set her up with a project everytime I sew. Like...right now she's watching Max & Ruby while I blog about keeping her occupied with cool craft projects. Ironic?

Molly

Tuesday, May 24, 2011

Rise and Shine mini-quilt

This was my first stab at a miniature quilt. I've found that I really enjoy the process of quilting, but I have a short attention span so full size (and even baby size!) quilts can feel a little monotonous to me by the time I'm nearing the end. That's not the case with a mini quilt! This one measures 13x16 and every part of it was so much fun to make! If you're new to quilting, this is a great way to get your feet wet without the commitment (and expense!) of a big quilt. I tried a little embroidery on this one too.

Photobucket

Photobucket

Photobucket

Mini quilts are generally used as a wall hanging, but they work as a unique table topper or placemat too!

Photobucket

I see many more mini-quilts in my future! This one is in the shop.


Molly

Sunday, May 15, 2011

More Marissa...

I really love this pattern.

Easter Dress 2011

A couple of my friends asked me to make dresses for their daughters after seeing pictures of my Maddie in her Easter dress. Here's one of them in my beloved hunky dory fabric. Some day I'll get sick of it...but not today!

Riley's dress

Riley's dress

I don't buy a lot of patterns. I'm a big fan of figuring stuff out myself or finding a free tutorial online. But I don't mind spending money on one of Carla's patterns. I always learn so much from her instructions! (The way she installs the zipper in this dress is genius!) She makes intermediate projects into beginner projects with her fabulous pictures and instructions. This is not a paid advertisement, I just really love her patterns. :)

Molly

Saturday, May 14, 2011

Just so you know...

So, just so you know...here's the deal. If I disappear from blogging for a week or two...you don't have to wonder where I am or what I'm up to.

You can just assume I'm loving on these two little munchkins:

Photobucket

Photobucket

Photobucket

Yes, I have the cutest kids in the world. Yes, I know I'm totally biased, but I still think it's true. :)

Molly

Monday, April 25, 2011

Sunday Bonnet Tutorial

Every little girl needs a bonnet - even if it's just to play dress up with!


I made this bonnet for Madeline for Plow Days, but then tweaked the pattern and added some ruffles and piping for these babies:

Photobucket

These are really super easy and I'm even going to show you how to shir with elastic thread and make your own piping! As always, I probably included more pictures and instructions than necessary - I know from experience that there is nothing more frustrating than following a tutorial and thinking "I wish they had a picture of that! I have no idea what that means!". As always, feel free to leave questions in the comments, I'll answer them there.


This bonnet will fit most little girls from 2-5 years old.


Ready, set - let's go!

Materials

1/2 yard main fabric
1/4 yard (or less - you may be able to get away with using scraps if you piece strips together, I actually used jelly roll strips I had on hand) trim fabric
elastic thread
thread to match fabric
light to medium weight iron on interfacing
chunky yarn or petite piping

Cut:

From Main fabric:
15 x 15 - cut one
3.5 x 14 - cut two for brim
3.5 x 20 - cut two for ties (alternately, you could use the trim fabric for the ties)

From trim fabric
2.5 x 30 (ish) - cut one for brim ruffle (it's not super crucial to have a particular length here - just as long as it's double your brim length)
1 x 15 - cut one for piping

From interfacing
3.5 x 14 - cut two for brim

Photobucket

1. Fuse your interfacing pieces to the wrong side of the two brim pieces. This will make your bring a little stiffer and not quite so floppy.

Photobucket

2. Using a bowl or other round object - cut a curve into the short end of your brim pieces. (tip: fold the fabric in half length-wise for matching curves.)

Photobucket
3. Repeat with your main bonnet piece.

Photobucket
4. Fold your ruffle piece in half, wrong sides together and iron.

Photobucket

5. Fold your tie pieces in half - right sides together - and iron in half. Fold one short end down at a 45 degree angle (is that right?) and iron. Cut the end of the tie off on the line you just made with your iron, creating a pointed end.

Photobucket

Photobucket

6. Sew your ties together, leaving the short, non pointed end open for turning. Clip corners, turn and iron flat.

Photobucket

7. Grab your ruffle strip and topstitch along the folded edge.

Photobucket

8. Set your stitch length as long as it will go and sew a basting stitch 1/4 inch from the raw edge. Do not backstitch.

Photobucket

9. Pull the bottom bobbin thread to gather your ruffle. You want to gather it as long as the rounded edge of your brim.

Photobucket

10. Line up the raw edge of the ruffle with the rounded raw edge of one of your brim pieces. Sew onto brim piece using a 1/2 inch seam allowance.

Photobucket


11. Place second brim piece over the first brim piece, sandwiching the ruffle piece inbetween them. Pin. Use the stitches from the first brim piece as a guide, sew pieces together.

Photobucket

12. Turn and press.

Photobucket

Piping mini-tutorial

You can skip this step, but the piping really does turn a plain jane bonnet into something a little more special. You could also pre-made piping. Here's how to easily make your own.

I just wanted very small piping, so I used some 8 ply yarn I had on hand.

Iron your 1 inch strip in half

Photobucket

Place your piping (or yarn!) inside the strip in the fold you just created with your iron.

Photobucket

You can use a zipper foot for this step (and you would certainly want to if you ever make larger piping), but I find that using my regular presser foot is fine for small piping like this. Sew as close to the piping as possible, sandwiching the piping in the strip of fabric.

Photobucket

Viola! Piping!


Photobucket

14. Pin your piping on the brim piece, raw edges together. Turn your piping under when you get to where the brim meets the ruffle, as shown in the pictures below and sew onto brim, using the original stitches in piping as a guide.

Photobucket

Photobucket

15. Take your main bonnet piece and iron the bottom straight edge under 1/4 inch and then again another 1/4 inch. Stitch.

Photobucket

16. Iron the sides of the main piece (just up to the curve) under 1/4 inch and then again another 1/4 inch. Stitch.

Photobucket

17. Set your stitch length to the longest it will go and sew around the entire curved edge (3 sides). Sew the stitches on the inside of the finished edges you just sewed - otherwise you won't be able to gather the stiches.

Photobucket

18. Gather the stitches.

Photobucket

19. Pin the bonnet piece to the brim piece, right sides together (piping is sewn on the right side) and raw edges alined. Leave 1 1/2 inches of the main bonnet piece on each end of the brim, as shown in the pictures below.

Photobucket

Photobucket

20. Using a 1/2 inch seam allowance, sew brim and main piece together, using the stitch line from piping on the wrong side of brim piece as a guide.

Photobucket

21. Trim away excess fabric and use a zig zag sitch to reinforce the seam.

Photobucket

Photobucket

Mini shirring tutorial

By using elastic thread in your bobbin, you can create a stretchy stitch that creates a faux smocked look. It's super easy and a great way to create shape.


Photobucket

Thread your thread through the hole in the top of your bobbin and carefully wind the thread around the bobbin by hand.

Photobucket

Photobucket

You don't want to wind it too tight or too loose. When you are finished, it should look something like this:

Photobucket

Load your bobbin as you normally would.

Photobucket

22. With your elastic thread loaded on your bobbin, set your stitch length to it's longest setting and sew three lines into the neck of the bonnet - each 1/4 inch apart, backstitching at the beginning and end of each row. You may need to stretch your fabric out flat when you are sewing your 2nd and 3rd row.

Photobucket

23. Attach your ties by folding the raw end under and stitching to the inside of the neck of the bonnet, right over the shirring rows.

Photobucket

24. Take your bonnet to the iron and steam the shirred rows. The steam shrinks the elastic thread and gives you a nice tightly shirred look. Here's a before and after picture - cool, huh?

Photobucket

Photobucket

Now stick your adorable new bonnet on your favorite little person and admire your handiwork!

Photobucket

Photobucket

Photobucket


I'd love to see a picture if anyone attempts a bonnet from this tutorial!


Molly


The Girl Creative